Hardwood Floor To Stair Transition - Complete How To Guide
What is a Floating Hardwood Floor?
Floating Hardwood Floor to Stair Transition
How to Install Hardwood Stair Treads
Installing Stair Nose Molding with A Floating Floor
Designing Hardwood Floor Transition to Stairs
Hardwood flooring transitions are a crucial element in any interior design. This simple detail will make your hardwood to stairs transition look fluid and finished. Furthermore, it will protect the stair edges. Inevitably, there are design questions about the color or patterns between the two.
Here is an example from a DIY forum. “I have golden pine floors on the main floor, but I’m installing red oak treads. I can’t match stains since oak has a reddish tint, and I cannot find that deep yellow-gold color of pine. What should I do?”
Or this one. “We are remodeling a condo and have a problem where the flooring meets the top of the steps. The best “look” would be to install the planks 90° to the top step. Unfortunately, that will make small lengths leading up to the step. Installing the boards parallel to the top of the step is easier but does not look as good. Is there a workaround?”
These are typical questions that people have creating a hardwood floor transition to stairways. We will reveal the answers to these adjoining floor issues in just a moment.
Although we focus on solutions using floating hardwood floors, the techniques also apply to engineered flooring.
What is a Floating Hardwood Floor?
You are familiar with hardwood floorings, but are you familiar with a floating floor? It refers to the installation method. For example, Easiklip floors are solid oak floating floors. To install them, you simply clip them together using patented aluminum clips. As the floor comes together plank by plank, the weight of the floor holds it in place. It “floats” on top of the sub-floor, unlike a permanent floor that uses nails, screws, or glue to attach it to the sub-floor.

Before installing a floating floor, or any floor for that matter, you must ensure that the subfloor is flat and level. Making a floor level can be tricky, but If you need advice on leveling a subfloor, check out our blog, “How to Use Wood Shims for Leveling a Wood Subfloor.”
Floating Hardwood Floor to Stair Transition
At some point, your hardwood flooring and stairs will meet either at the bottom, the top, or both. Or maybe you’ve got one of those sunken living room situations. One homeowner asked how to lay the boards leading up to the stairs, parallel or perpendicular, for the best look.

A flooring professional answered this way...
“How long do you spend looking at the foot of the stairs? As long as it takes to put your foot on a step. For this situation, let’s be practical. If the space is 3ft x 3ft, that’s only 9 square feet. If the room is 900sf, that space is just 1%. Do you want to change 99% of your floor to make 1% of the space fit? The bottom line is, this is a transition space, and you do whatever you need to make it work.”
Plan the transition before you purchase or start to lay the floor. This way, you’ll have enough material, especially if you plan to use a herringbone or diagonal pattern that requires extra boards.
In other words, don’t stress too much over the look at the transition point. Concentrate on the larger floor.
Does The Floating Wood Floor Need to Match the Stairs?
The staircase is both a transition and a focal point. If both floor types are the same, either carpet or wood, then use the same material on the stair steps. If there are different materials on the two floors, try to coordinate one of the materials to match the other. The best choice is to make the stair treads from the same wood as the floor. The risers (planks that cover the vertical surface between stairs) can be a different color, but matching the treads creates a uniform look for the space.

The other design question posed in our introduction revolved around color. The person wanted to make pine and red oak look alike. There is no way to make two very different species look alike unless you cover them completely. The only two options to make them look alike, in this case, are to cover the stairs with a runner or paint them so the color and grain won’t show.
Advantages of a Floating Floor
Installing a floating floor from Easiklip has many advantages.
Save Cost and Installation Time
An Easiklip floor comes pre-finished and ready to install. There is no need to sand and finish on-site, which can add a week to your project and hundreds of dollars in labor or tool rental.
Easiklip floors simply clip together using aluminum clips. You don’t need nail guns, compressors, glue, or screws. See why it’s the easiest solid oak flooring to install here.
Eco-friendly and Sustainable
Floating floors are environmentally friendly because they use less wood. Easiklip uses white oak, a tree species grown around the world.
Also, floating floors don’t use adhesives that can outgas fumes. Both the wood floor and the aluminum clips can be dismantled and used again in another location. This portability reduces the need to use more lumber or metals.
Added Comfort
One of the nice things about walking on a floating floor is they are comfortable under your feet. Unlike tile, concrete, or stone, these floors offer some flexibility due to the slight cushion of the underlayment between the hardwood floor and subfloor. Walking on a floating floor is better for your knees and back.
Remove and Relocate
A floating hardwood floor does not attach to the subfloor. It’s easy to pull up the planks and unclip them should you need to repair or replace one. You can also relocate the floor to another room or another home entirely.
How to Install Hardwood Stair Treads
Whether you want to convert the stairs from carpet to hardwood or you want to match the stair treads to the floor, here is what you’ll need to do.
Trim Planks to Size
If you use one plank to create the tread, you should sand it first. Whenever you cut the ends or back, set the table saw to a 5° angle. The angle makes a tight fit on the board’s face but leaves a slight gap behind it. The gap allows for the addition of adhesive and provides a squeak-free fit.
You need to measure and cut each tread and riser using a stair gauge. It provides the exact size and angle of each cut on both ends of the board. This video shows you how at the 2:15 minute mark.
Measure and cut each tread individually as most stair steps vary slightly. When measuring the depth of the tread, be sure to add a 1¼ inch overhang.
If you use Easiklip flooring, you’ll use stair nose molding to ensure the proper overhang.
This article won’t go into the entire stair-building process. For more details on assembling Easiklip flooring for stair treads, go to “How to Install Oak Stair Treads With Molding and Riser.”
Installing Stair Nose Molding with A Floating Floor
Let’s examine a hardwood floor to stair transition at the top of the stairs. The easiest way is to run the floorboards parallel to the length of the stair treads. That’s usually the way most second-floor hallways run anyway and applies to the staircase landings as well.

Two Stair Nose Moldings
There are two types of stairs molding you can use, overlap stair nose or flush mount. A flush mount nosing butts up tight against the adjacent floorboard, such that the flooring surface remains equal height.. It is the same height as the floor, making it flush. You may need to use shims to make both the floor and the molding flush and level. Tack or glue the shims in place before installing the molding.

You can attach the flush mount stair nose molding using adhesive or pre-drill holes and nail it to the subfloor. If possible, use the tongue and groove side of the Easiklip flooring to attach the nose molding. Watch How to Install Flush Stair Nosings to see how to do it.
Another option is to glue flush stair nosing to the subfloor and use T-molding to cover the floors expansion space between the floor and the nosing.
Overlap stair nose molding covers the required expansion space between the floor and the molding. It overlaps the adjacent board, sitting slightly higher than the board. For this reason, it’s not the best nosing for stairs as it can create a tripping hazard.
Start by gluing 1/4 to 1/8 inch shims under the floating floor. You don’t want the shim to extend under the gap. Position the molding to overlap the floor by 1/4 inch to 3/8 inch but leave an opening for the required natural expansion gap. Apply two 1/4-inch beads of construction adhesive to attach the molding to the subfloor. Additionally, you can pre-drill pilot holes and nail it in place.
When transitioning from the bottom floor to the staircase, you can cover the gap between the riser (the vertical surface between each stair) and floating floor using a piece of shoe molding (that you can easily attach with finish nails or a couple beads of construction adhesive) if necessary.

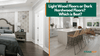
Designing Hardwood Floor Transition to Stairs
The question that owners of multi-story homes ask is, should the stairs match the floor upstairs or downstairs? Experienced interior designers and flooring experts agree on this answer. Stairs are the transition between both floors, and therefore, should coordinate with both the upstairs and downstairs flooring.
For example, if you have carpeting upstairs and wood downstairs, you can use a matching carpet runner to transition between floorings.

Most designers opt to unify the transition from floor to stairs by using the same wood on both. As your eyes travel from the floor and up the staircase, it has a seamless look that you can only achieve by using the same hardwood.
Easiklip floating hardwood floors work on any floor and the stairs. You have five prefinished color choices, and we offer matching stair nose molding to make your DIY job look professionally finished.

As an Amazon Associate, Easiklip Floors earns from qualifying purchases. This helps us provide more great blog content. Thank you for your support.
- Easiklip Floors